This guide is for the Windows 11 operating system. Using Windows 10? Check out our guide over here!
Read BlogHow to Modify SOLIDWORKS Serial Keys
Here’s a step-by-step guide to changing your SOLIDWORKS serial number in Windows 11:
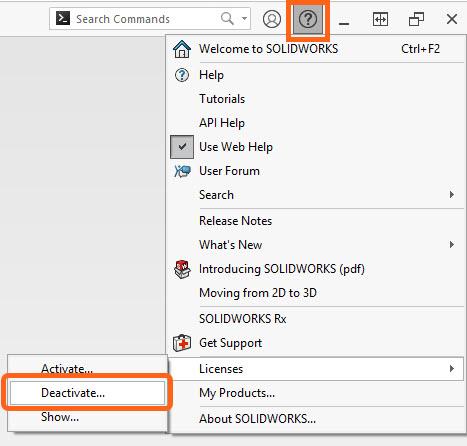
- Begin by deactivating the license from the computer.
- Inside SOLIDWORKS, go to Help > Licenses > Deactivate.
- Follow the Wizard until the process succeeds.
![select licences]()
- Close any/all open instances of SOLIDWORKS.
- Open the Windows Start menu and type ‘Add or Remove’. Choose to open the Add or Remove Programs system settings from the search results.
![add or remove programmes]()
- Select SOLIDWORKS from the list of programs and click Modify to open the SOLIDWORKS Installation Manager.
![modify install]()
- In the Installation Manager, select Modify your installation and click Next.
![choose modify]()
- Change the serial numbers as required on this page then click Next, and allow SOLIDWORKS to install whatever extras it requires.
![serial key]()
- Click through Next until the final page where you can click Modify Now.
![choose next]()
![]()
- The Serial number which this computer is associated to for SOLIDWORKS has now been changed.


This process is applicable to standalone installations only on the Windows 11 operating system. For help with network licensing (SNLs) and admin image installations, please get in touch with our expert Technical Support team.
[DAM-VIDEO-32973]
Take the Next Steps
If you find your workflow disrupted or just have a question about SOLIDWORKS, then be sure to utilise the benefits of your SOLIDWORKS subscription.
Give us a call on 01926 333 777 or drop us an email and one of our expert Engineers will be in contact.